采用Flex布局的元素,称为Flex容器(fcontainer),简称”容器”。它的所有子元素自动成为容器成员,称为项目(item)。

1
2
3
.box{
display: flex | inline-flex;
}

container

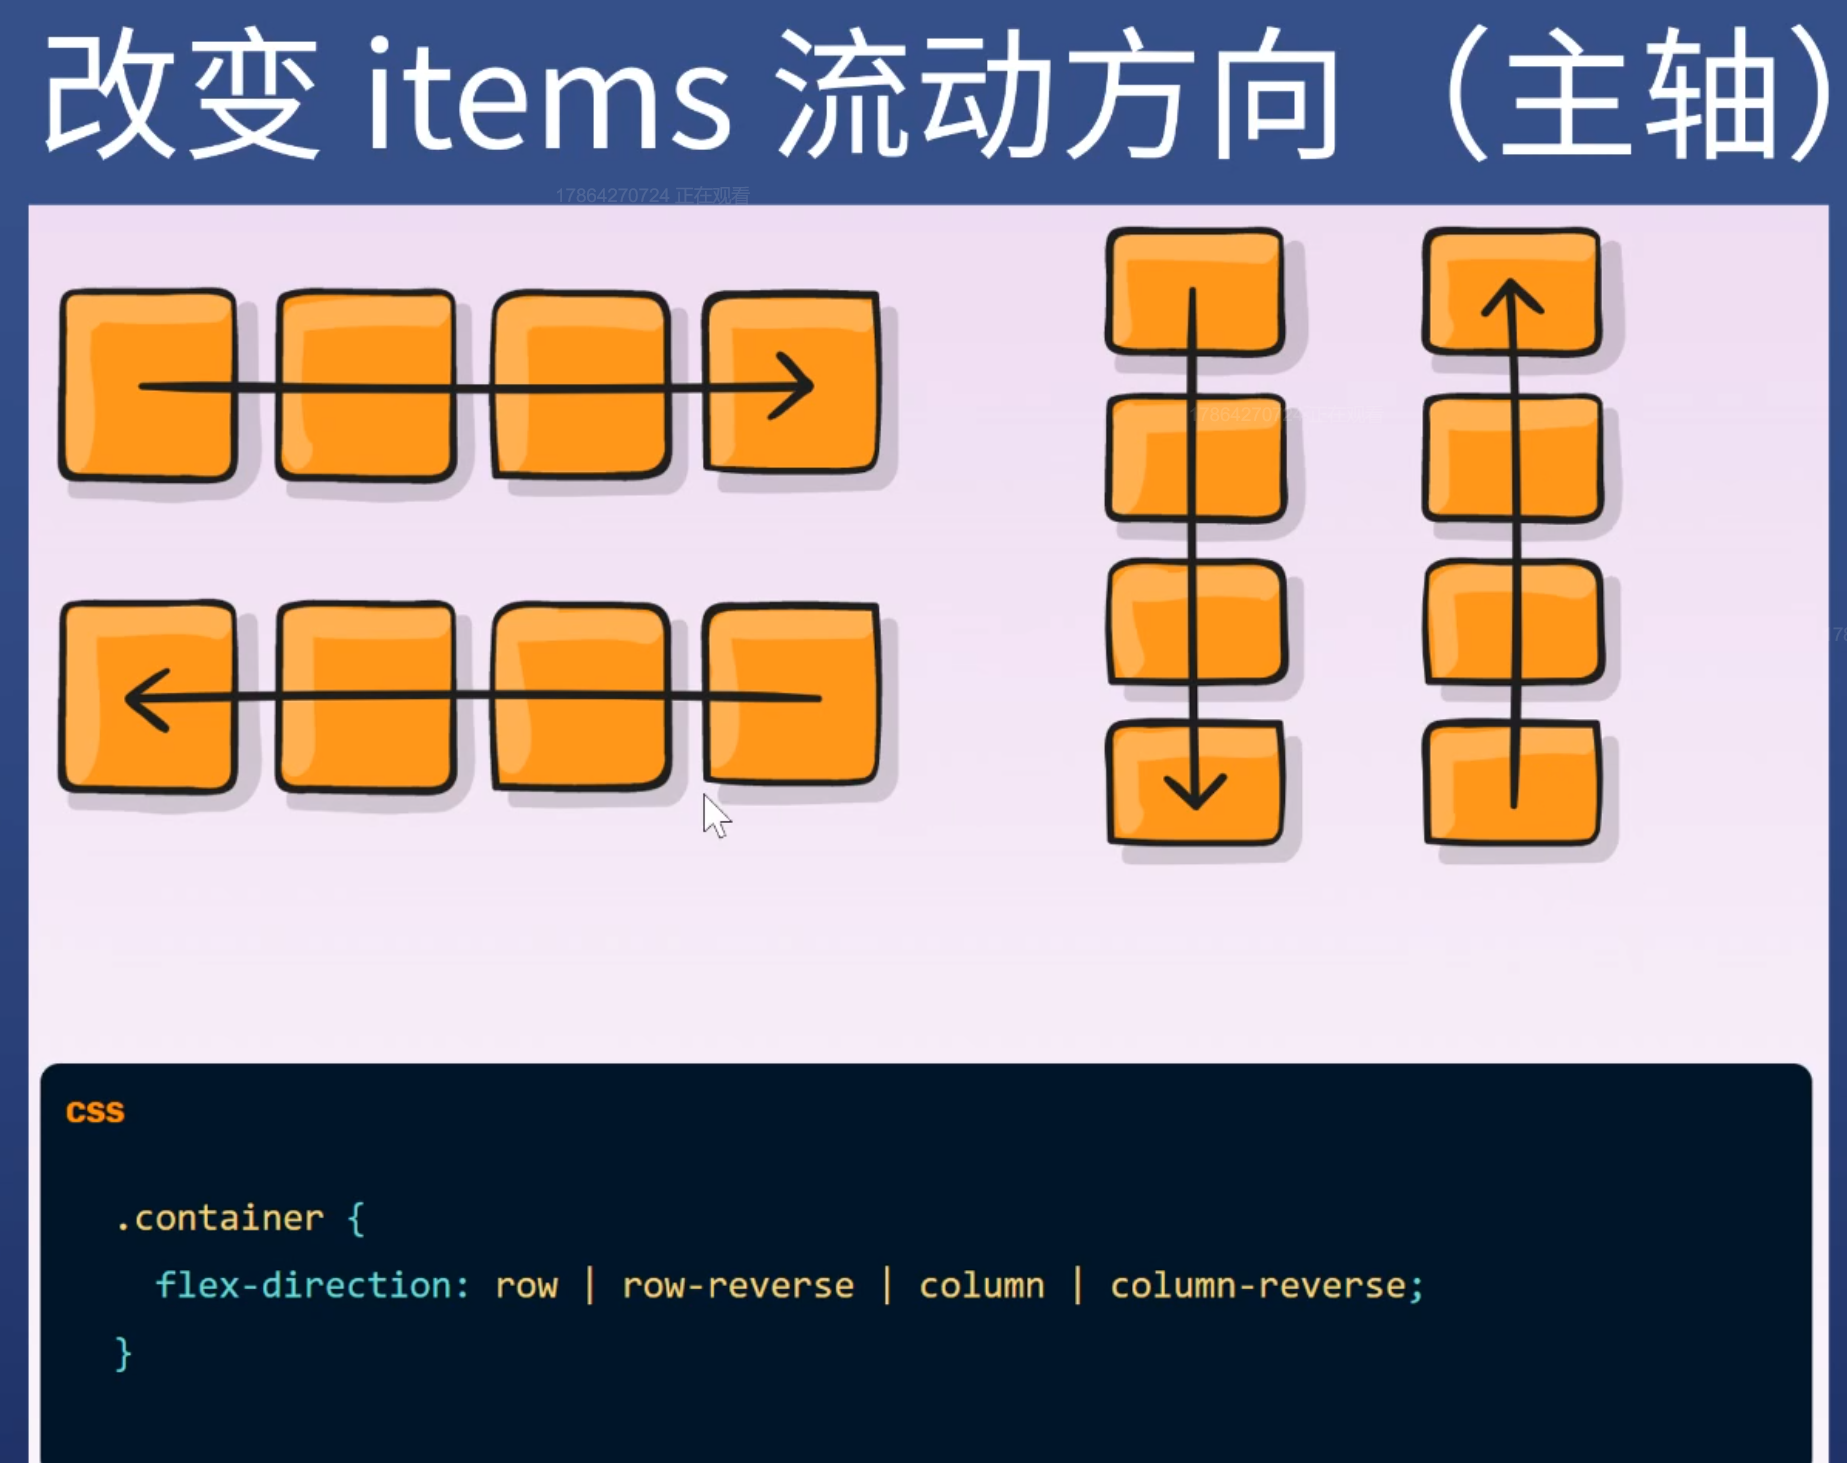
flex-direction

1
2
3
.container {
flex-direction: row / row-reverse / column /column-reverse;
}

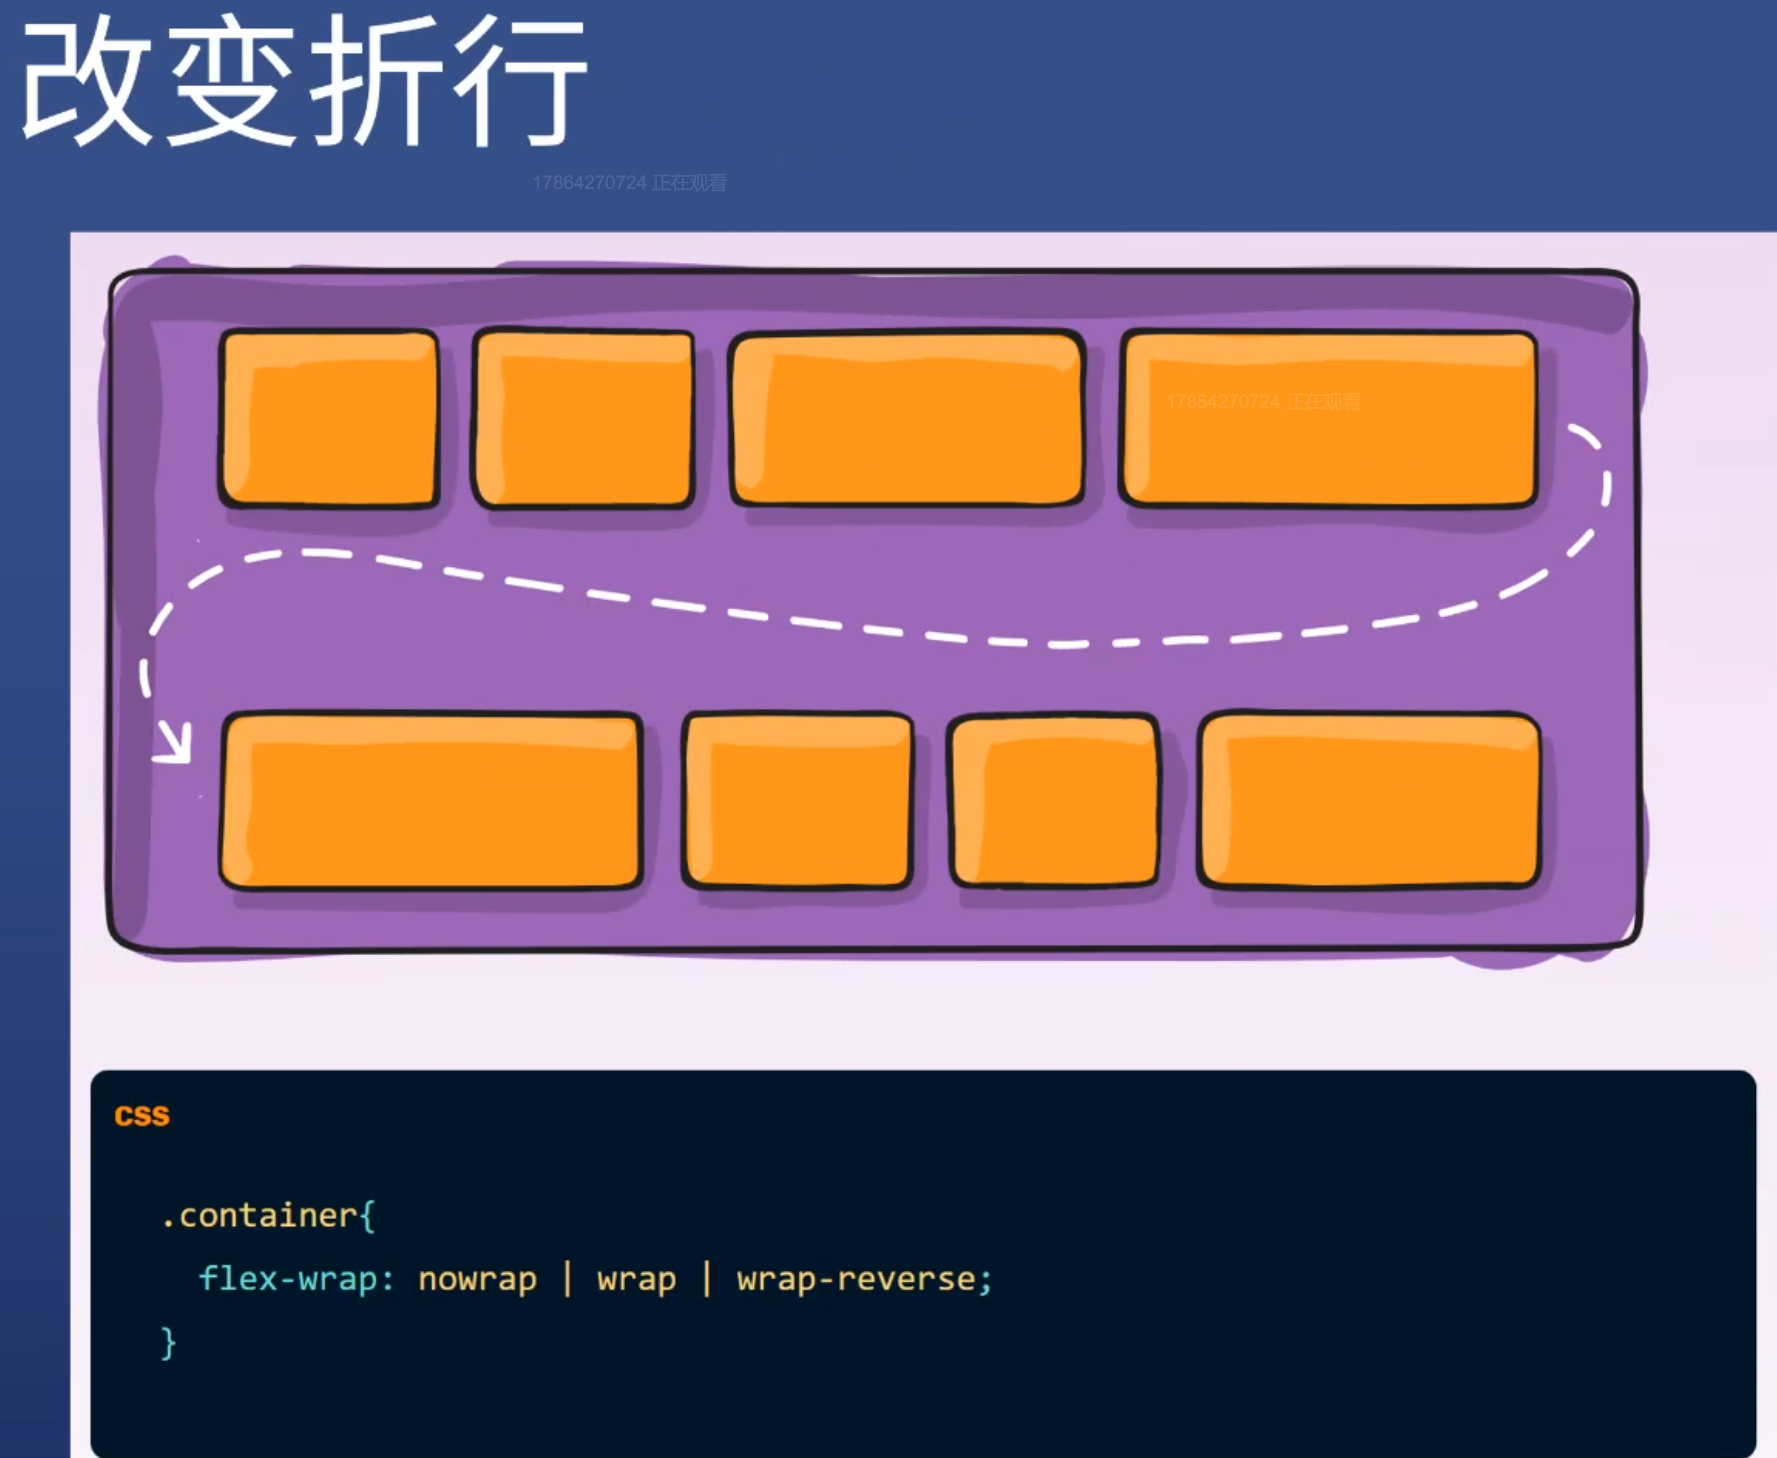
flex-wrap

1
2
3
.container {
flex-warp: nowarp / wrap / wrap-reverse;
}

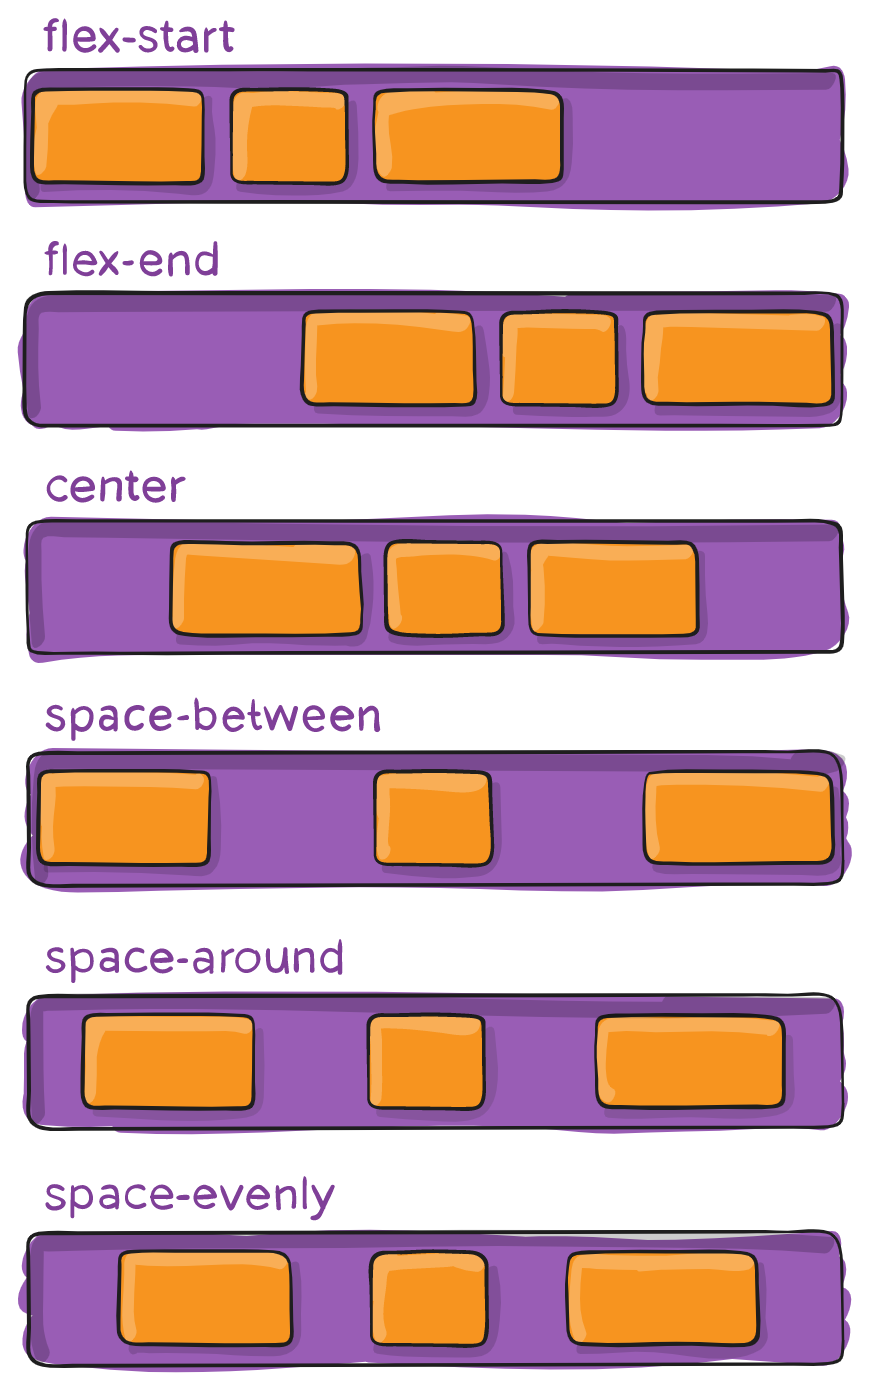
justify-content

Snipaste_2021-08-27_11-19-38
1
2
3
.container {
justify-content: flex-start / flex-end/ space-between / sapce-around / space-evenly;
}

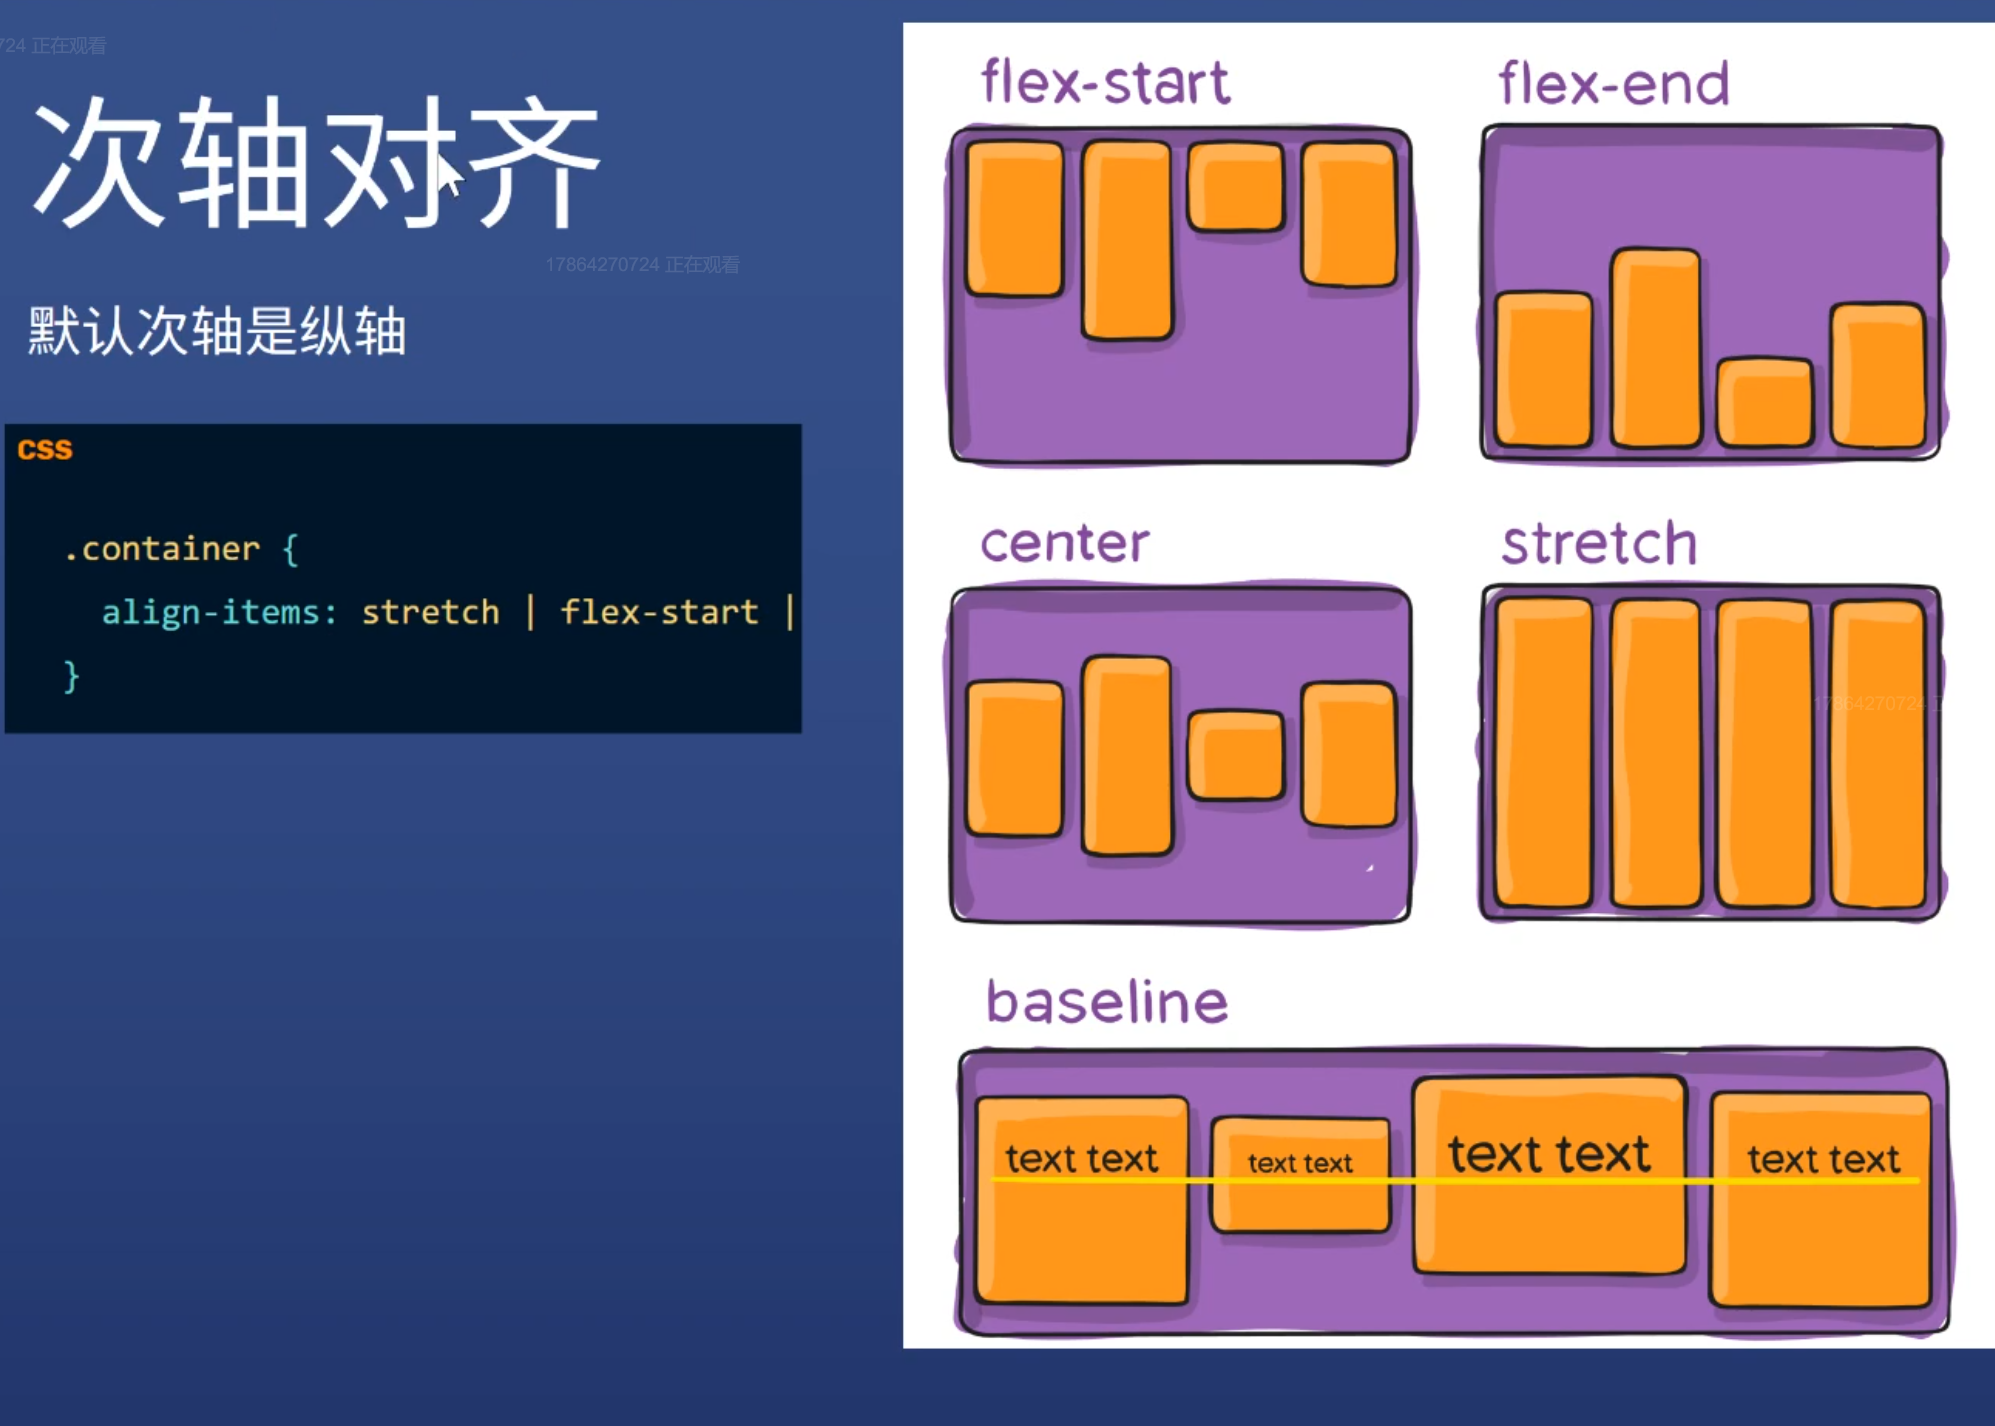
align-items

1
2
3
.container {
align-items: flex-start / flex-end / center / stretch / baseline;
}

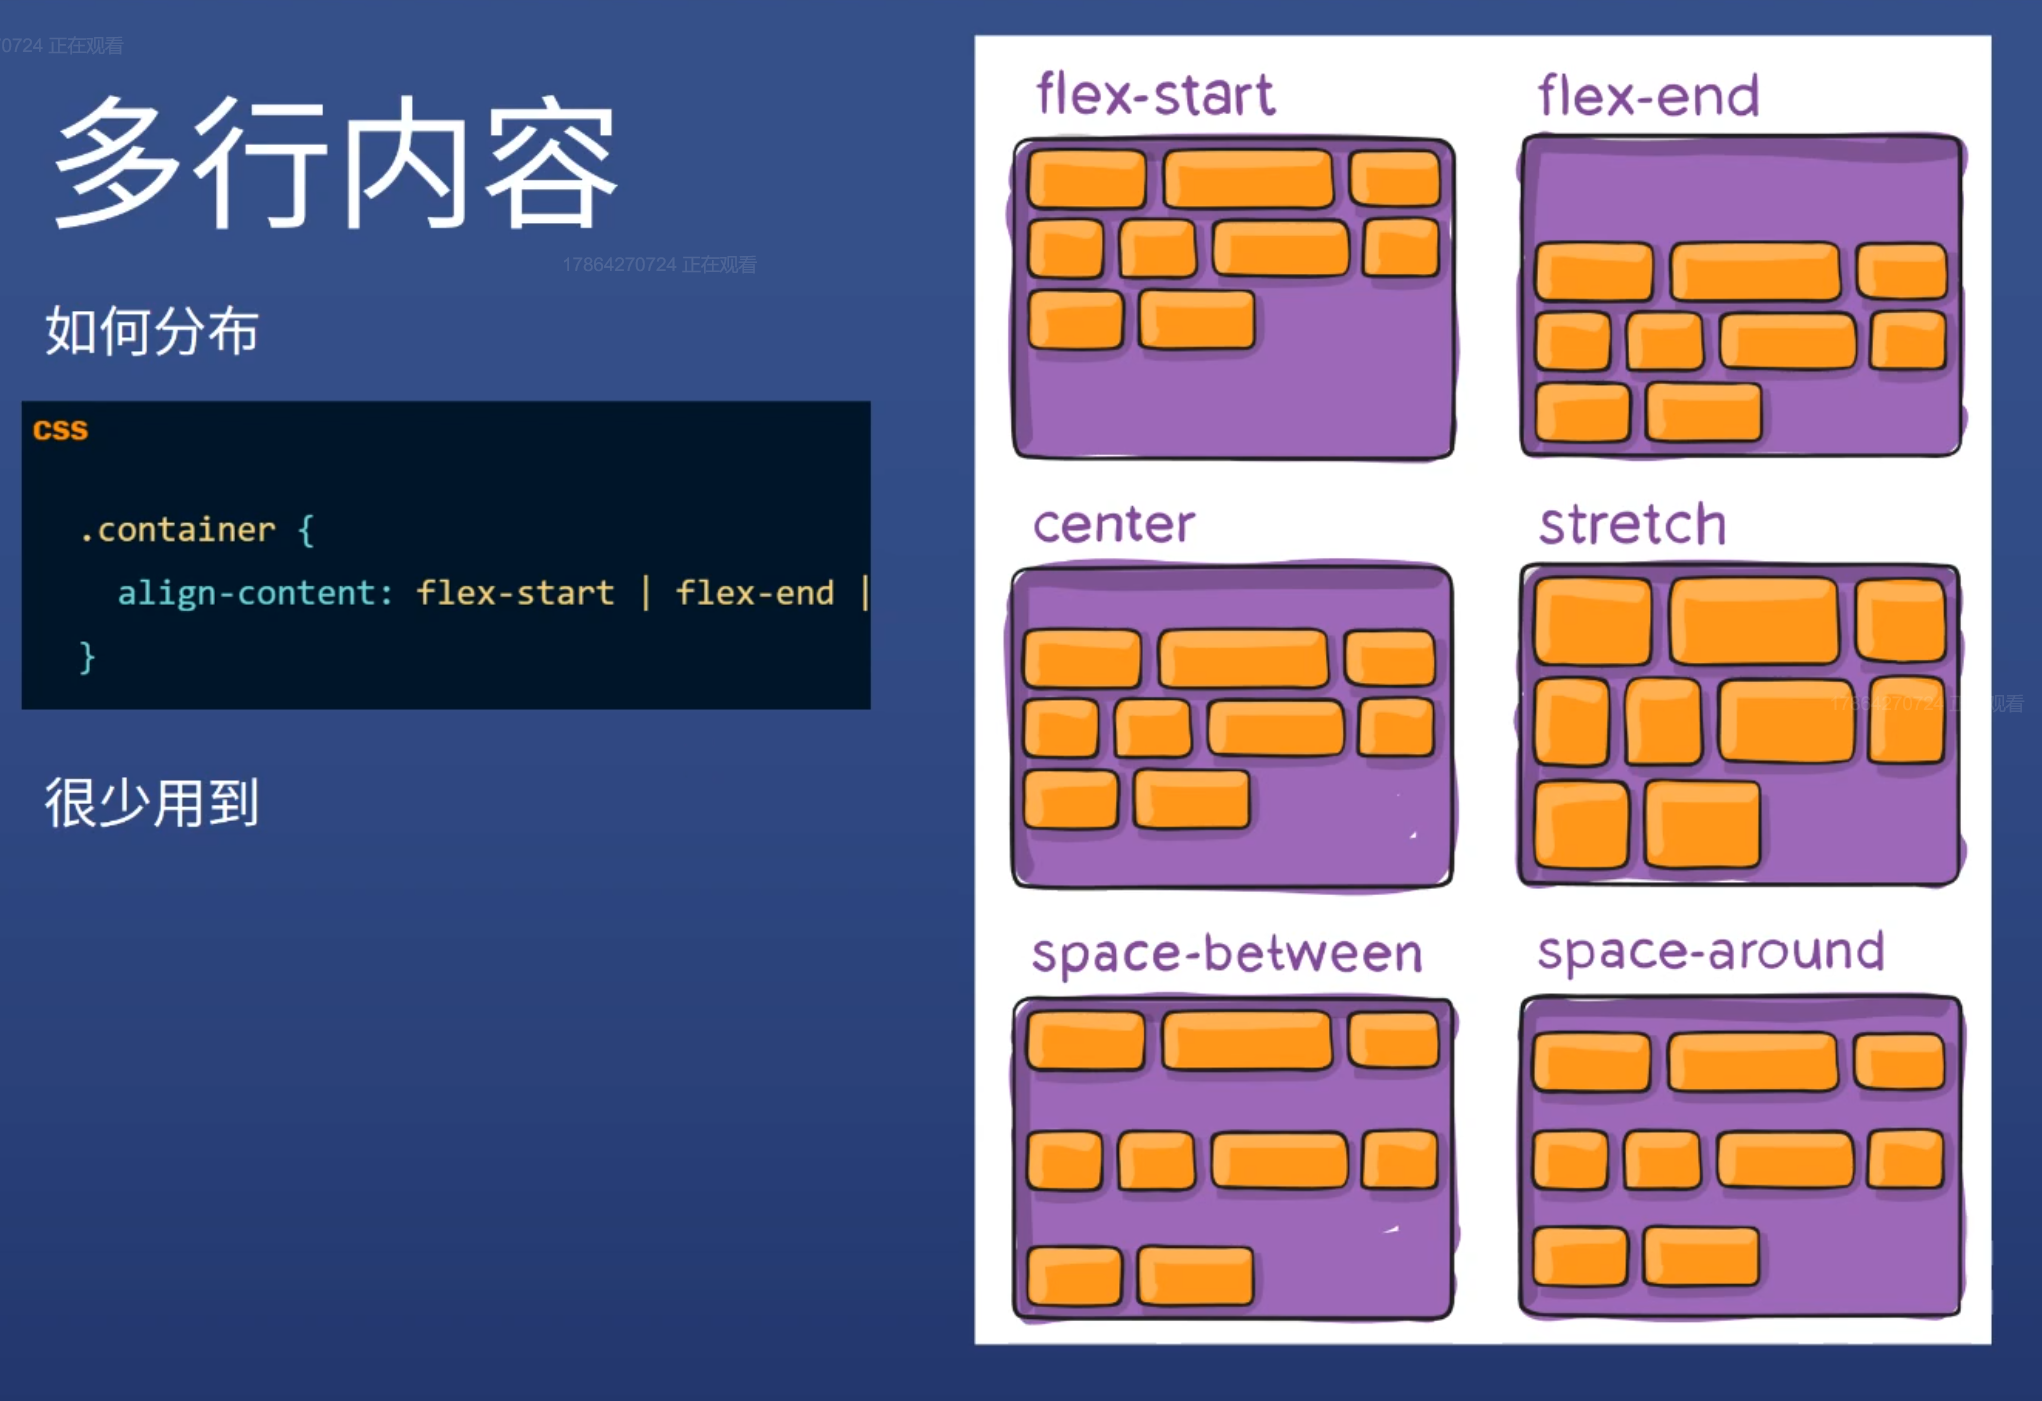
align-content

1
2
3
.container {
align-content: flex-start / flex-end / center / stetch / space-between / space-around;
}

item属性

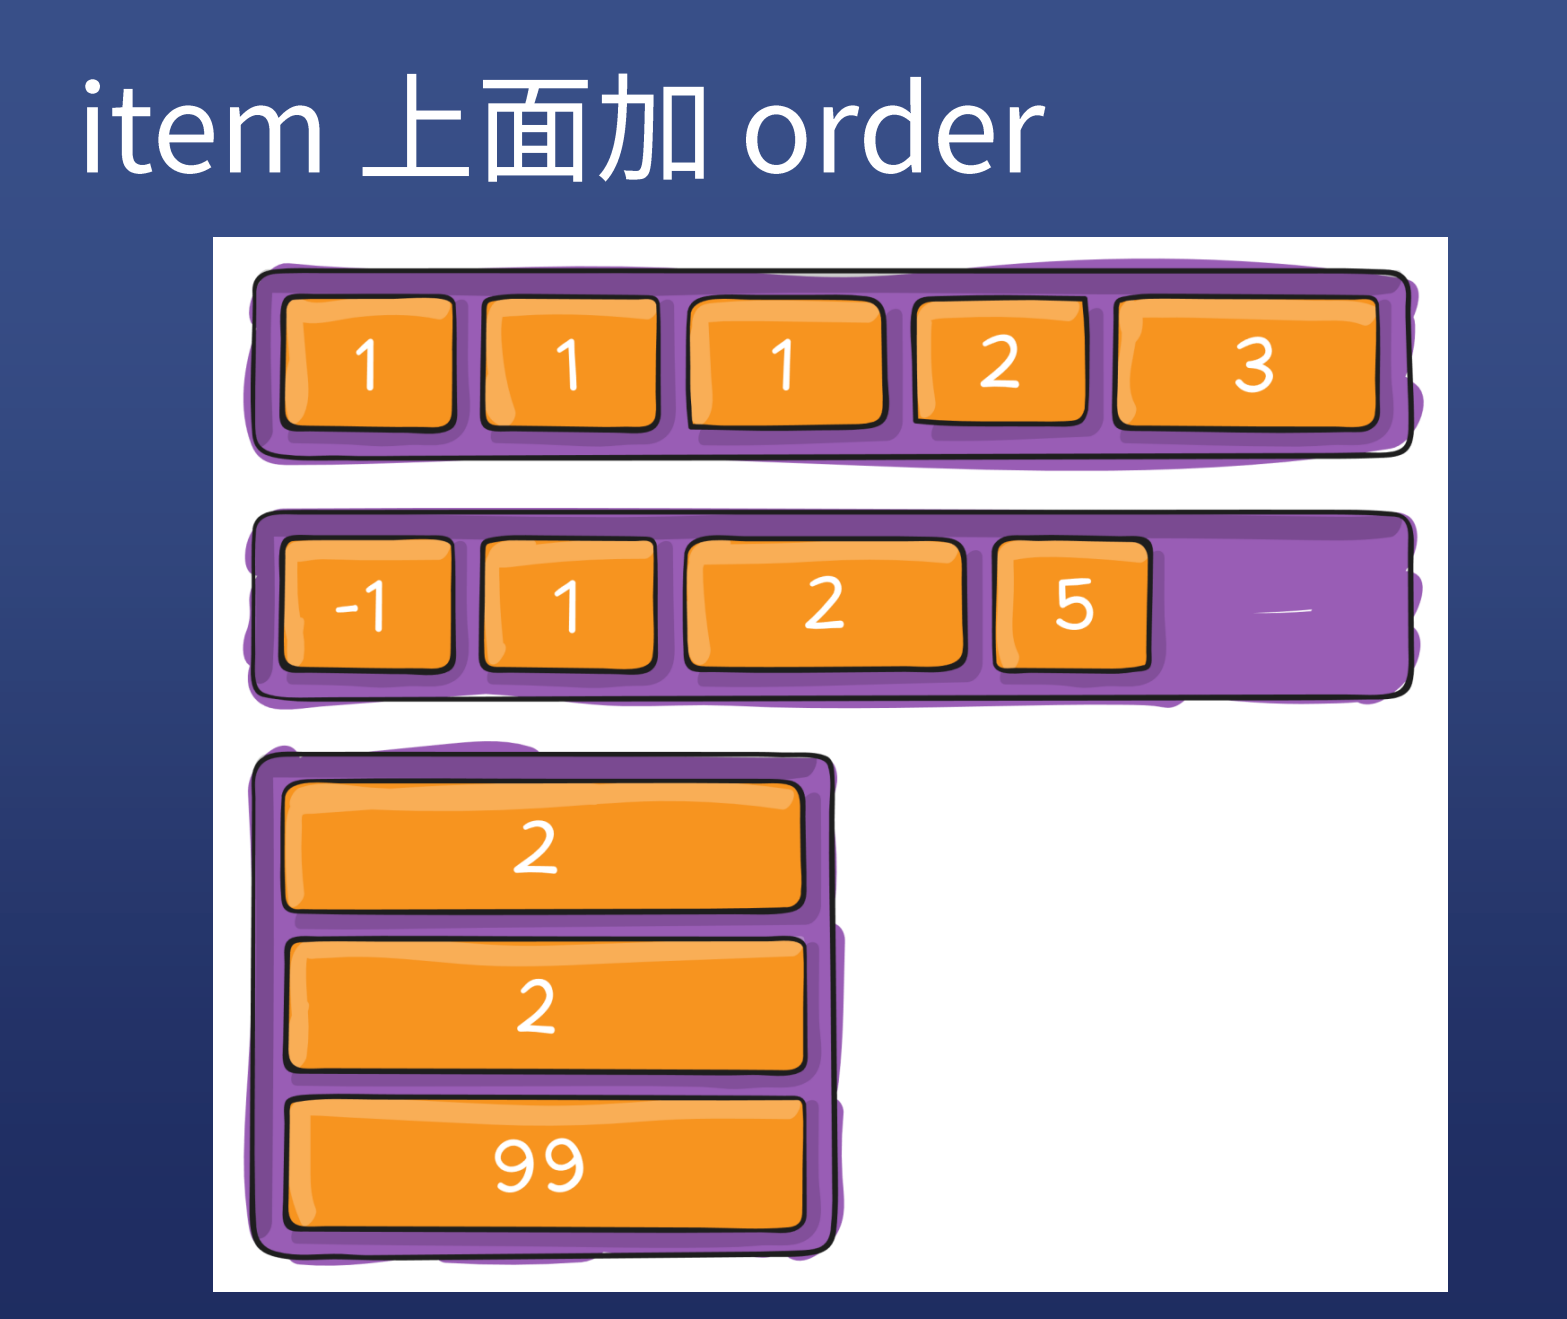
order

1
2
3
4
5
6
7
8
9
.item:first-child {
order: 1;
}
.item:nth-child(2){
order: 1;
}
.item:nth-child(3){
order: -2;
}

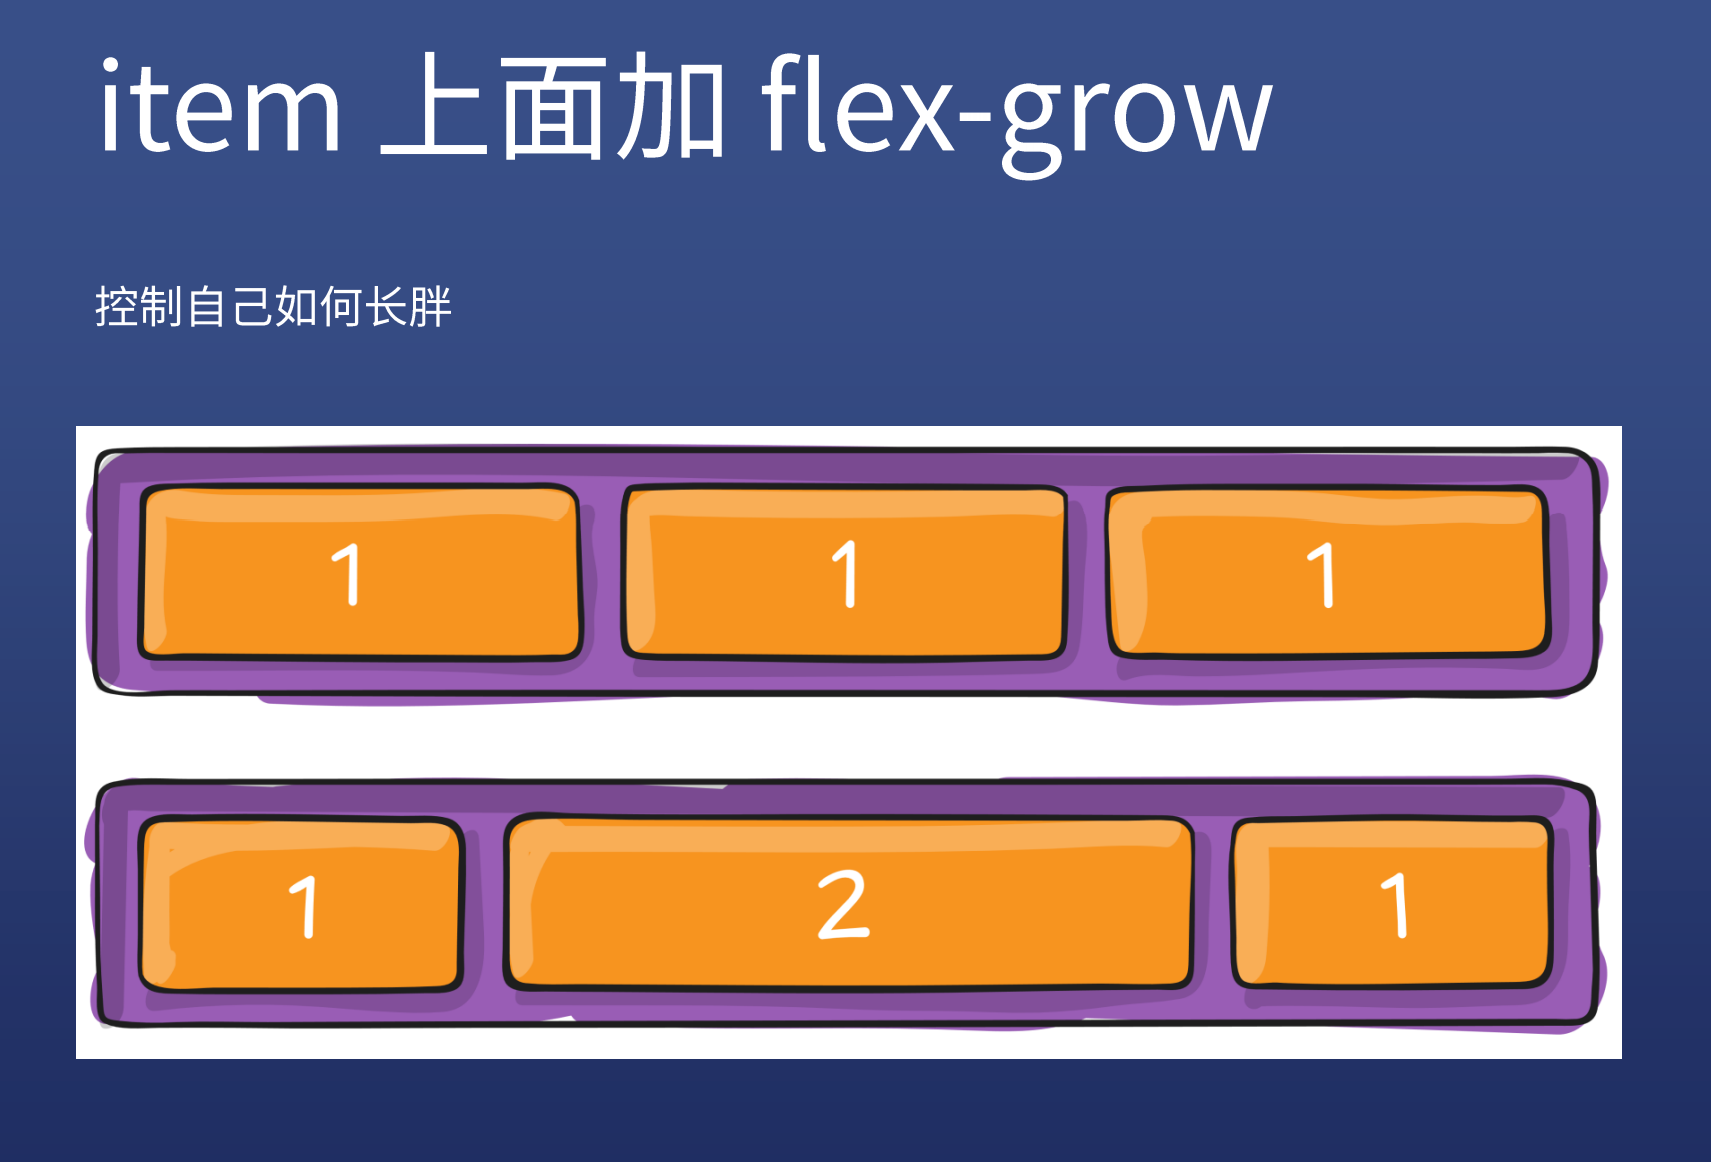
flex-grow

item-flex-grow
1
2
3
.item {
flex-grow: 1 / 2;
}

flex-shrink

控制如何变瘦,一般写flex-shrink: 0;防止变瘦,默认是1

1
2
3
4
5
6
7
8
9
10
11

.item {
flex-shrink: 1;
}
.item:nth-child(2){
flex-shrink: 5;
/* 缩放程度更快 */
}
.item:nth-child(3){
flex-shrink: 1;
}

flex-basis

控制基准宽度,默认是auto,就是宽度,不常用

1
2
3
.item {
flex-basis: 100px;
}

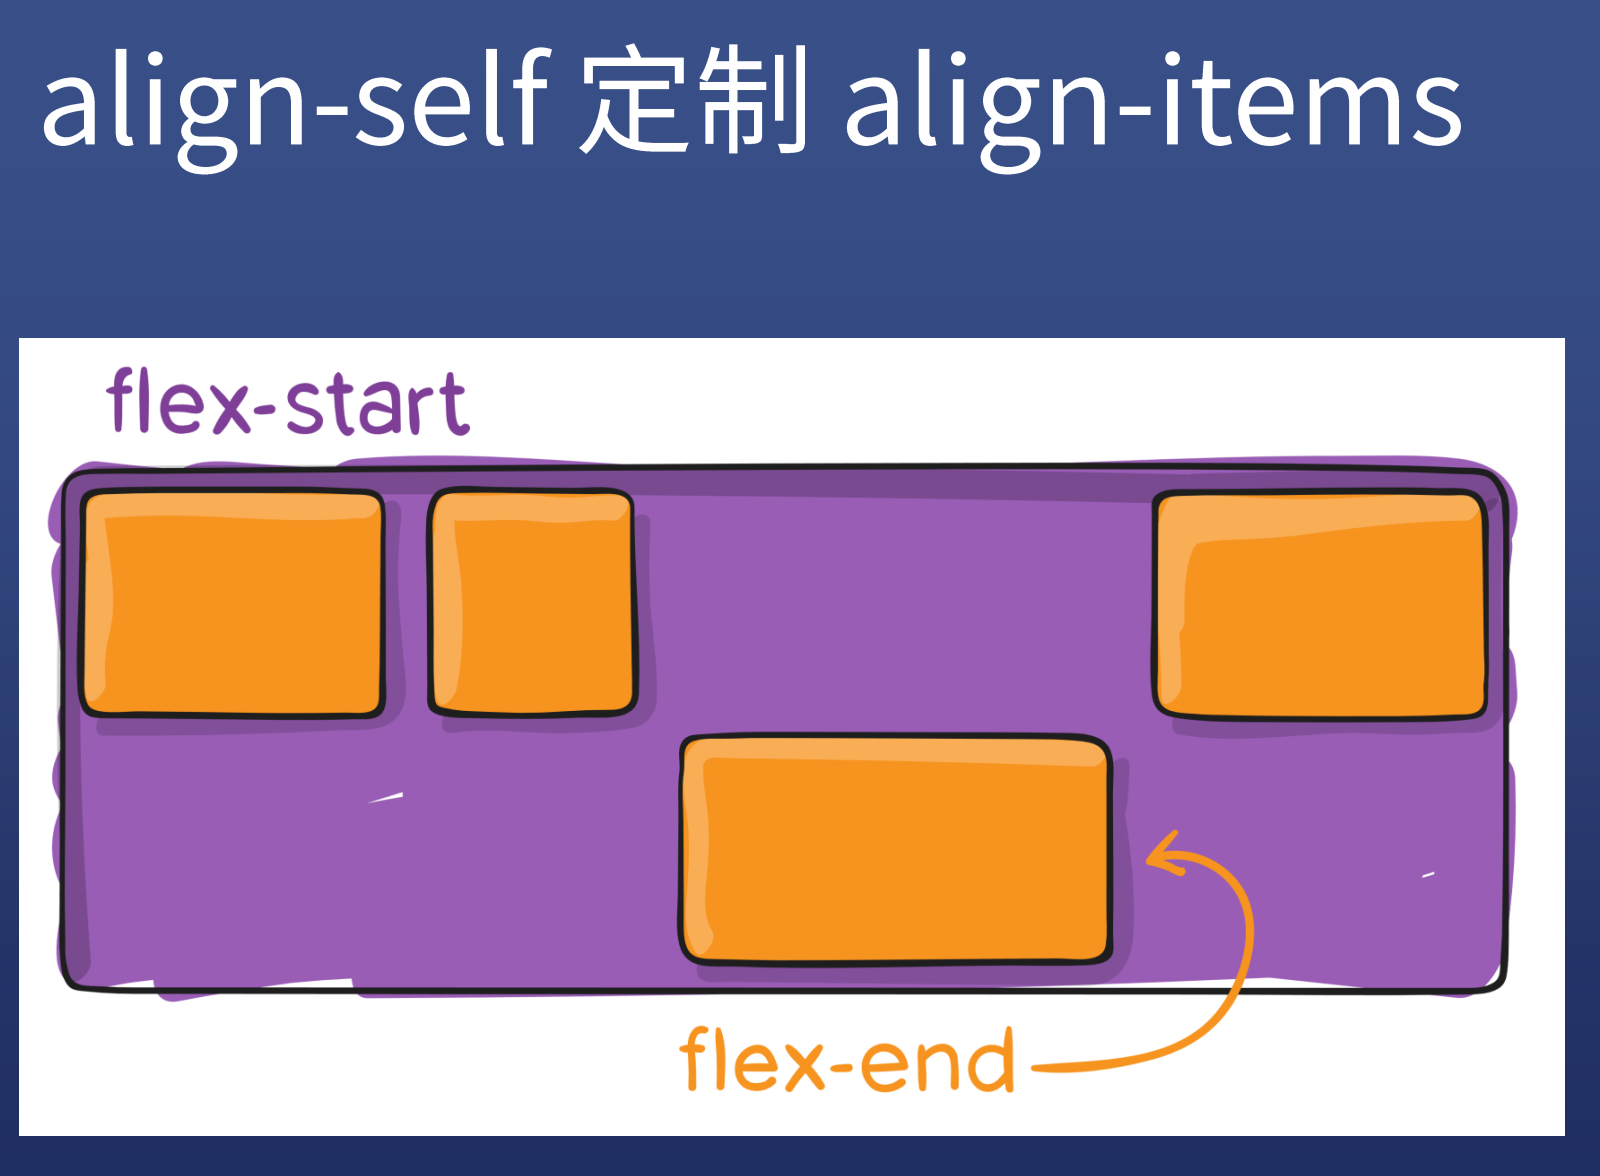
align-self

item-align-self
1
2
3
.item {
align-self: flex-end;
}

重点

1
2
3
4
5
6
7
8
9
10
11
12
13
14
/* 工作中基本只用这些 */
dispaly: flex;

flex-direction: row / column;
/* 流动方向,横或竖 */

flex-wrap: warp / nowarp;
/* 是否换行 */

justify-content: center / space-betten;
/* 主轴(横轴)方向 居中或分开对齐 */

align-items: center;
/* 次轴*(竖轴)方向,居中 */

flex小游戏

Tips:

不要把 width 和 height 写死,除非特殊说明

  • 写死 width:100px
  • 不写死 width:50% / max-width:100px / min-width:80% / width:30vw
  • 特点:不使用 px,或者加 min max 前缀

margin-xxx: autojustify-content: space-between实现相同的效果,推荐使用前者

参考自A Complete Guide to Flexbox

Snipaste_2021-08-20_08-33-25

问题

  1. 使用换行后 no-wrap,间距变大,在父元素加上 align-content: start

步骤:

  1. 子元素加上 float: left 和 width
  2. 在父元素上加 .clearfix

经验:

  • 有经验者会留一些空间或者最后有一个不设 width
  • 不需要响应式,因为手机上没有 IE,而这个布局是专门为 IE准备的

IE 6/7 存在双倍 margin bug, 两个解决办法(基本不用):

  1. 针对 IE 6/7 把 margin 减半

  2. 加一个 display: inline-block

1
2
3
4
5
6
7
8
9
10
11
12
13
14
.clearfix:after {
/* 清除浮动 */
content: '';
display: block;
clear: both;
}

IE bug
/* margin 减半 && inline-block */
.class {
margin-left: 10px;
_margin-left: 5px;
display: inline-block;
}

为什么要清除浮动

float demo

Tips:

  • border 有时候会干扰尺寸,可以改成 outline
  • 用 float 做平均布局时,可以在布局中增加一个x图层,其多余的右边距可以用 负的 margin 来改善布局
Snipaste_2021-08-20_08-33-25

1. a

  1. href:
    • 网址: //google.com
    • 路径: a/b/c.index
    • 伪协议代码: javascript:;. mailto: 邮箱. tel: 手机号
    • id: href = #xxx
  2. target: 新窗口打开
    • _blank: 新标签页打开
    • _top: 最顶层页面打开
    • _parent: 上一级页面打开
    • _self: 自身页面打开,默认为这个属性
  3. download: 下载
  4. rel=noopener: 解决安全问题

2. iframe

内联框架元素, 它能够将另一个HTML页面嵌入到当前页面中。基本不用了

3. table

1
2
3
4
5
6
7
8
9
10
11
12
13
14
15
16
17
table {
table-layout: auto/fixed;
border-collapse: collapse;
border-spacing: 0;
}

<table>
<thead>
<tr><th>english</th><th>翻译</th></tr>
</thead>
<tbody>
<tr><td>hyper</td><td>超级</td></tr>
</tbody>
<tfoot>
<tr><td>reference</td><td>引用</td></tr>
</tfoot>
</table>

4.img

发出get请求,展示图片。永远不能让图片变形!!!

  1. alt: 图片未加载,显示alt值
  2. src: 图片源
    1
    2
    3
    4
    5
    6
    7
    8
    9
    10
    11
    <img id="xx" src="youxiu.jpg" alt="pupian">
    <script>
    // 两个事件
    xx.onload = function() {
    console.log("图片加载成功");
    }
    xx.error = function () {
    console.log("图片记载失败");
    xx.src= "404.jpg";
    }
    </script>

    5. form

    1
    2
    3
    4
    5
    6
    7
    8
    9
    10
    11
    12
    13
    14
    15
    16
    17
    18
    19
    20
    <!-- 属性
    autocomplete 自动填充 input需要加上name=“username”
    targe=_blank 新打开标签页提交表单
    -->
    <form action="/a" method="POST" autocomplete="on" target="_blank">
    <!-- input必须有name -->
    <input name="username" type="text">
    <input type="submit" value="提交">
    <input name="gender" type="radio"><input name="gender" type="radio">
    <button>提交</button> <!-- 没写type的话默认type="submit" -->
    <!-- input type="color/password/radio/checkbox/file/hidden" -->
    <textarea style="resize: none;">文本区</textarea>
    <select>
    <option value="">请选择</option>
    <option value="Mon">周一</option>
    <option value="Tue">周二</option>
    <option value="Wed">周二</option>
    </select>
    <!-- input事件 onchange/onfocus/onblur -->
    </form>

html入门

HTML全名”超文本标记语言”(HyperText Markup Language)
英国物理学家蒂姆·伯纳斯-李(Tim Berners-Lee)发明。

首先写这一套,Emmet语法!

1
2
3
4
5
6
7
8
9
10
11
<!DOCTYPE html> 文档类型
<html lang="en"> 语言 中文为zh-cn
<head>
<meta charset="UTF-8"> 设置字符编码
<meta http-equiv="X-UA-Compatible" content="IE=edge">始终使用最新内核来渲染页面
<meta name="viewport" content="width=device-width, initial-scale=1.0"> 禁用缩放,兼容手机
<title>标题</title>
</head>
<body>
</body>
</html>

章节标签

h1~h6

1
2
3
4
<h1>一级标题</h1>
<h2>二级标题</h2>
...
<h6>六级标题</h6>

section

article

section表示一个有主题的独立部分,通常用在文档里面表示一个章节,比如article可以包含多个section。section总是多个一起使用,一个页面不能只有一个section。
每个article,通常包括标题(h1 - h6元素)作为article元素的子元素。

1
2
3
4
5
6
7
8
9
10
11
<article>
<h1>文章标题</h1>
<section>
<h2>第一章</h2>
<p>...</p>
</section>
<section>
<h2>第二章</h2>
<p>...</p>
</section>
</article>

p

1
<p>表示一个文本段落</p>

main

1
2
3
4
5
6
7
8
9
10
<body>
<header>页眉</header>
<main>
<article>
<h1>文章标题</h1>
<p>文章内容</p>
</article>
</main>
<footer>页尾</footer>
</body>

aside

1
2
3
4
5
6
7
8
9
10
11
12
网页通常用来放置侧边栏
<body>
<main>主体内容</main>
<aside>侧边栏</aside>
</body>

文章用来放置标注或评论
<p>第一段</p>
<aside>
<p>本段是文章的重点。</p>
</aside>

全局属性

全局属性是所有元素都可以使用的属性。

id

表示元素的唯一,必须是全局唯一。

1
2
3
<p id="p1"></p>
<p id="p2"></p>
<p id="p3"></p>

class

元素类名,类名可以相同,也可以多个.

css和js通过类选择器或DOM方法(document.getElementsByClassName)来选择和访问特定的元素

1
2
3
4
5
<p class="para"></p>
<p></p>
<p class="para"></p>
<p class="p1 p2 p3"></p>

contenteditable

允许用户编辑内容

1
2
3
<p contenteditable="true">
鼠标点击,本句内容可修改。
</p>

hidden

布尔属性,表示当前的元素不在跟页面相关<p hidden>本句不会显示在页面上。</p>

style

指定当前元素css样式,如<p style="color: red;">hello</p>

title

为元素添加说明,鼠标悬停显示属性值

1
2
3
<div title="版权说明">
<p>本站内容使用创意共享许可证,可以自由使用。</p>
</div>

内容标签

ol+li(ordered list + list item)

有序列表

ul+li(unordered list + list item)

无须列表

dl+dt+dd(description list + term + data)

1
2
3
4
5
<dl>
<dt>山东</dt>
<dd>济南<dd>
<dd>青岛</dd>
</dl>

自定义列表

pre(preview)

预定义格式文本,保留原来格式

1
2
3
4
<pre>
床前明月光,疑是地上霜
举头望明月,低头思故乡
</pre>

br(break)

换行<br>

a(anchor)

超链接到其他网页或同一页面的某一位置

<a href="www.baidu.com" target=_blank>点击跳转到百度页面</a>

code

显示代码

1
2
var x = 1
console.log(1)

em

强调,表示语气

strong

强调,内容重要,一般为粗体

q(quote)

行内引用

blockquote

块级引用
Welcome to Hexo! This is your very first post. Check documentation for more info. If you get any problems when using Hexo, you can find the answer in troubleshooting or you can ask me on GitHub.

Quick Start

Create a new post

1
$ hexo new "My New Post"

More info: Writing

Run server

1
$ hexo server

More info: Server

Generate static files

1
$ hexo generate

More info: Generating

Deploy to remote sites

1
$ hexo deploy

More info: Deployment